For JPEG 2000 images,you can select JPEG 2000 profiles and other options.
The information included below is provided with the assumption that the user is familiar with the JPEG 2000 standard. Parameter choices accommodated by the JPEG 2000 specification are of such a broad and varied range that it is possible for users to select settings that prove counterproductive to their goals. In particular, some optimal settings can result in degraded decode performance. Considerable trial and error may be required to achieve desired results when diverging from defaults and recommended settings.
A JPEG 2000 image consists of one or more tiles, which are regions of the image that are compressed independently. The order of the resulting "packets" is governed by two settings: Tile Parts and Progression Order. These settings are especially useful to those who need to target specific JP2 workflows.
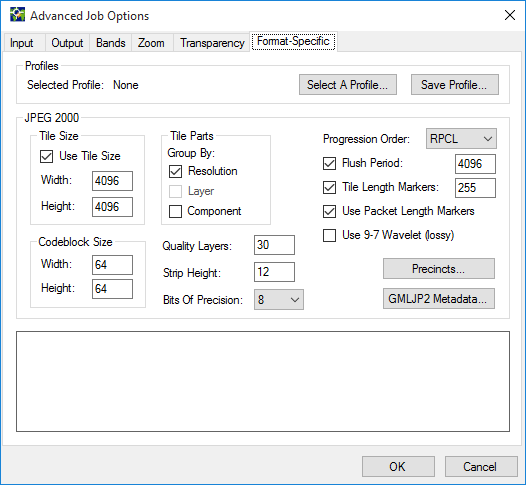
When JPEG 2000 is selected as the output file type, the following advanced options are available:
This panel enables you to invoke a list of supported profiles comprised of preset encoding options for particular workflows, and to save your own custom profiles. For more information see Using JPEG 2000 Profiles.
If enabled, the tile size must be no larger than the dimensions of the source image. Smaller tiles reduce the amount of memory required to encode the image, however the use of tiles may introduce edge artifacts.
Default: 4096 x 4096.
Tiles may be written to the JPEG 2000 file sequentially or interleaved. When tiles are interleaved, Tile Parts defines the group of packets that are written together. Tile parts can be grouped by Resolution, Layer, or Component, depending on which Progression Order you use. If no grouping option is selected, the file is written sequentially.
If an image consists of many tiles, then grouping first by Resolution allows a decoder to display a course resolution of each tile first, and then finer resolutions as more of the file is received.
Some Progression Order options preclude grouping by one or more of the Tile Parts options. For example, the factory default progression order of RPCL sets the Tile Parts option to Resolution, while making the Layout option unavailable and the Component option available.
Progression Order lets you specify the order in which packets will appear in a given file. This facilitates certain workflows. Progression Order may have a significant impact on the time and memory usage required to encode and/or decode the image.
Default: RPCL
When codestream flushing is enabled, less memory may be required to encode the image. The flush period should be on the order of the strip height being used. Using the flush period should not significantly affect output image quality.
Default: 4096
Determines whether or not Tile Length Markers (TLMs) are to be put into the JPEG 2000 codestream. Use of TLMs may provide better decode performance.
Default: 255
Enables or disables the use of packet length markers. Use of packet length markers may improve decoding performance.
Default: Enabled
Specifies that the floating point 9-7 wavelet be used for encoding, instead of the default integer 5-3 wavelet. The 9-7 wavelet will not encode an image losslessly, however, it may result in a better looking image at higher compression ratios. This option is disabled by default and is only available when the "Encode Losslessly" option is not selected. By default, the NPJE and EPJE profiles use the 9-7 wavelet.
JPEG 2000 codeblock size is subject to the following restrictions:
The default codeblock value is 64 x 64.
This value indicates the number of quality layers with which to encode the image. Among other things, quality layers enable better “streaming” (progressive transmission and display) in some applications.
Default: 30
Affects memory usage. Increasing this value may improve runtime performance, but at a cost of requiring more physical memory. This value should be decreased when encoding very large images. Changing the strip height does not affect the quality of the output image.
Default: 12
Enables you to choose how many significant bits are to be used from the samples of the source imagery. For example, an image may consist of 16-bit data values, but only eleven of those bits may be meaningful.
Default: Enabled
The table below indicates GeoExpress’ original or “factory” default JP2 settings. Unless you have changed your JPEG 2000 preferences, they are the settings that will serve as defaults for your JP2 encoding.
To edit preferences, see Setting Preferences.
| Option | Setting |
|---|---|
| Use of tiles | Enabled |
| Tile Size | 4096 x 4096 |
| Tile Parts | By resolution |
| Progression Order | RPCL |
| Flush Period | 4096 |
| Tile Length Markers | 255 |
| Packet Length Markers | Enabled |
| 9-7 Wavelet (Lossy) | Disabled |
| Code Block Size |
Width: 64 Height: 64 |
| Quality Layers | 30 |
| Strip Height | 12 |
| Precincts | 256 x 256 |
| Metadata Forms Included in Output |
MrSID, World file, GeoTIFF (GeoJP2) |
Using precincts may improve the performance of decode operations for certain image encodings such as those in which tiles are not used. The Precinct Editor enables the user to enter precinct sizes for all of the zoom levels of the image.
Default: GeoExpress uses precincts in which width and height values are both 256.
To access the Precincts Editor:
Click Precincts… on the Format-Specific tab of the Advanced Job Options dialog box.
The Precincts Editor dialog box appears.
To disable use of precincts, clear the Use Precincts check box.
To edit a precinct value:
Precinct sizes must be powers of two, except for the last one in the list, which has the lowest resolution.
Click the GMLJP2 Metadata button to write GML metadata to the JPEG 2000 image or to specify a GML data file.
When the GMLJP2 check box is selected, GML metadata is added to the output file according to the GMLJP2 Application Schema version 3.1.1., which can be found at http://schemas.opengis.net/gml/.
If you would rather use an external file that contains all the coverage and other GML data, you may specify that file when the "Write GMLJP2 metadata box" check box is cleared.
By default this check box is selected.
If an external world file is present, its information trumps any metadata. Absent a world file, metadata are evaluated in the following order of priority:
NOTE: If a world file is present, then no coordinate reference system is associated with the output file (a NULL WKT is applied).