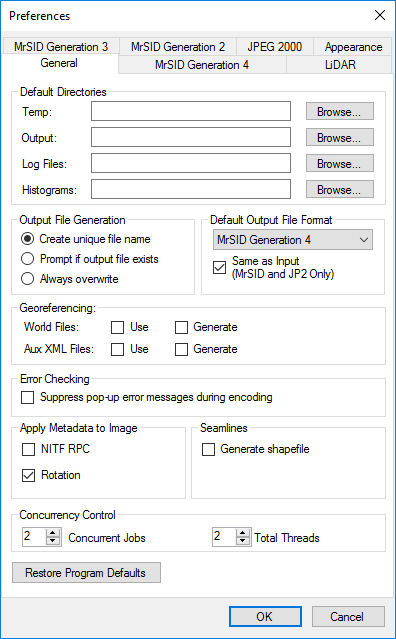
Set general preferences to set the default settings for all files.
You can define default Temp, Output, Log File and Histogram directories by browsing or by entering a filepath.
When GeoExpress encodes a MrSID Generation 2 image, it creates a series of temporary files that are used in constructing the final MrSID image. Collectively, the temp files are roughly equivalent in size to the created MrSID image. These files are deleted immediately upon completion of an encoding project.
Encoding requires enough disk space to accommodate both the output image and the equivalent size of the output image in temporary files. (For more information, System Requirements.)
By default, GeoExpress uses the default Windows temp directory, typically C:\Temp, to store these temporary files. You can specify an alternate directory by entering the full path name in the Temp Directory field. If you are unsure of the entire path, click Browse to navigate to the preferred directory.
If an output or temp directory has been specified and afterwards deleted or moved, GeoExpress will prompt you to specify a new directory.
By default, the output directory is the same location in which the input image resides. In the case of image mosaics, the output directory is the location in which the first image listed within the mosaic resides.
To have all MrSID images written to a single directory, enter the desired directory path in the Output field. Specifying a default output directory does not affect filenames already in the Job list. Only images and mosaics added to the Job list after the default directory is specified adopt the new output directory.
This check box enables the user to set the Log File output directory. If the user does not manually change the directory location the default location will be displayed.
By default, histogram files are created in the same place as their source images, but if they cannot be created there (for example if the source images are in a non-writable directory), then they are created in an auxiliary directory specified in the Histogram field. If the histograms cannot be created in the image source directory and this field is blank, the histogram files are saved to "C:\Documents and Settings\username\My Documents\LizardTech\GeoExpress\9.5.4\histograms".
If the “Create unique file name” radio button is selected when a new MrSID file is created in a directory where a file of the same name exists, the new file name is appended with an underscore and a number. For instance, if two files named image.sid are created in the same directory, GeoExpress names the second file image - copy 1.sid. Additional files created are appended with incremental numbers (such as image - copy 2.sid).
If the “Prompt if output file exists” radio button is selected, you will receive a prompt when GeoExpress finds an existing file with the same name as the output file. A “Save As…” dialog box appears asking for a new file name.
If the “Always overwrite” radio button is selected, GeoExpress overwrites existing files.
Many USGS DOQ files have the same file name with a different extension. If “Always overwrite” is selected, MrSID files created from multiple USGS DOQ files overwrite one another. LizardTech recommends that the “Always overwrite” feature NOT be used when working with USGS DOQ images.
A drop-down list enables you to select the default file format to use for output files. Regular options are MrSID Generation 4 (MG4), MrSID Generation 3 (MG3), MrSID Generation 2 (MG2) and JPEG 2000. Support for encoding NITF images is available for GeoExpress (contact your LizardTech representative to purchase the NITF Extension for GeoExpress). Unless this default is changed manually, it is MrSID Generation 4.
You can override this behavior for MrSID and JPEG 2000 files; if you check the box labeled "Same as input," then the output file format will be the same as the input file format if the input file is MG2, MG3, MG4, or JPEG 2000. For input files of any other format, the default output format will be specified by the drop-down menu option.
Check Use next to World Files to have GeoExpress use the georeferencing information in a world file for an image or mosaic tile, rather than native georeferencing.
This option will override any coordinate reference system (CRS) metadata—including well-known text strings (WKTs)—that may have been embedded in the file. You can manually edit the CRS in the image metadata with the Edit Metadata tool. For more information on selecting a CRS in the metadata, see Editing Raster Metadata.
Check Generate to automatically generate world files upon encoding.
For more information, see World Files.
Check Use next to Aux XML Files to have GeoExpress use georeferencing information in an Esri Aux file, rather than embedded CRS metadata. Selecting this option overrides the Use World Files option if it is also selected.
Check Generate next to Aux XML Files to automatically generate Esri Aux files upon encoding. This enables you to make sure the georeferencing metadata in your MrSID and JPEG 2000 imagery will be readable in Esri applications.
When several jobs are being encoded as a batch, errors may occur that could interrupt the encoding project. These errors may be internal (for example, GeoExpress may encounter a corrupt or incompatible image or mosaic), or they may be external (for example, a Windows or network error). To force GeoExpress to ignore any such error messages and attempt to continue with the encoding project, select the Suppress Pop-Up Error Windows During Encoding option . The error messages will be written to the log file.
If your images contain metadata for image rotation or rapid positioning capability (RPC), you can manipulate the image so that it reflects the information in the metadata. You can select the following preferences for image metadata:
NITF RPC metadata maps pixel data to location data for orthorectification. Select this option to apply the orthorectification described in the NITF RPC to the image.
NOTE: To apply orthorectification, the NITF RPC metadata must use the WGS 84 datum.
Image rotation metadata describes the direction that an image should point. For example, an image might contain metadata that rotates an image so that it points north. Select this option to create rotated images with empty space in the corners. The empty space is compressed so that it does not add to the size of the image. This option is selected by default so that your images are displayed with the correct orientation even in viewers that do not support metadata for image rotation.
The following figure shows a rotated image:

The black areas represent the parts of the image that do not contain data values. In MrSID Generation 4 images, the no-data values are stored in the alpha band. For more information on alpha bands, see Alpha Bands and MrSID.
For raster mosaics, you can choose to generate a shapefile representing the tiles that make up the image. When viewed in an appropriate application (such as GeoViewer), you can overlay the shapefile on the output image to identify the original tile positions.
Select this option to have the default for raster mosaics include a seamlines shapefile in the output.
If you run GeoExpress on a machine with a multi-core processor or on a machine with multiple processors, GeoExpress creates multiple threads to process jobs more quickly. You can set the following preferences for concurrency:
The maximum number of concurrent jobs and total threads that you can set equals the number of cores in your processor. For example, if your machine has six cores, you can run a maximum of six concurrent jobs and six threads. For machines with more than eight cores, the maximum is eight. By default, the number of concurrent jobs and total threads equals the maximum.
If you reduce the number of total threads, GeoExpress uses fewer cores. Reduce the number of total threads when you want to perform other processor-intensive tasks on the machine that runs GeoExpress.
You have 12 jobs that you want to run on a machine with six cores. The following list describes how GeoExpress runs the jobs for various preference combinations:
GeoExpress continues running as many concurrent jobs as possible until it finishes all 12 jobs.
The Appearance tab of the Preferences dialog box enables you to change the color and width of lines and highlights that are applied in the Image Crop, Area of Interest and Color Balance Tile Selector dialog boxes. Colored rectangles display the color currently selected.
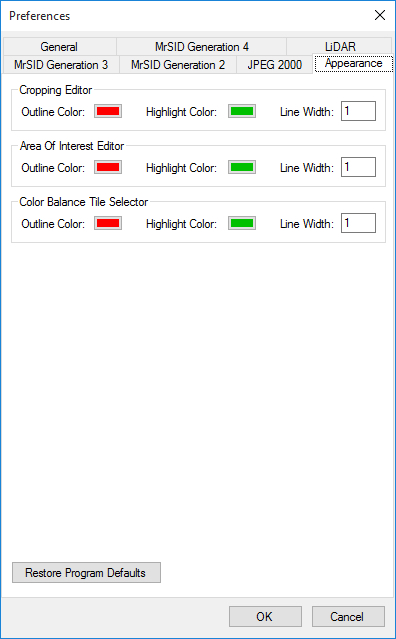
To change a line width, enter the desired value in the appropriate Line Width field.